Pages

Sunday, 25 January 2015

Simon Lee Workshop - Week 1

I am currently doing an online workshop with artist Simon Lee.  Simon is a concept designer and sculptor working on films like Pacific Rim. He is self taught and it wasn't until his forties that he found himself being approached by Guillermo del Toro to work on his film. There is a very interesting interview that Stan Winston workshop did with Simon here https://www.youtube.com/watch?v=ZO9Alq1UFZw and for those of you who love monsters and creatures you should check out Simon's website http://www.bigbluetree.com/

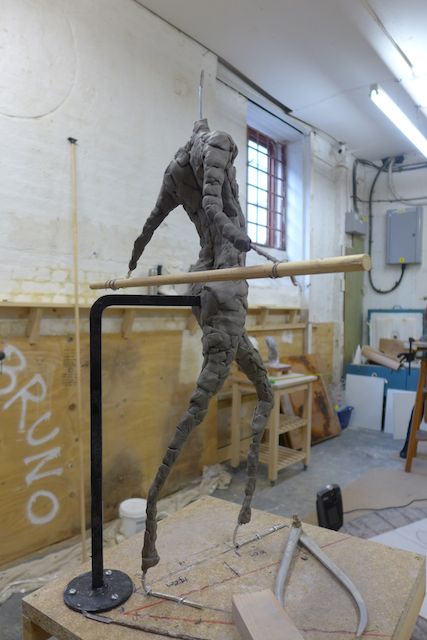
This week we started off making a very simple armature with aluminium wire. The sculpt is about 11" tall. I found the wire I had a bit hard to work with due to it's thickness about 1/8th (3mm)" so I am just doing the best I can and have ordered some thinner wire to try. I am using Chavant medium clay which I am warming to a workable condition in a little toaster oven.  What I hadn't really thought about though was it is winter and I have found the clay is hardening quicker than I can work it so I am thinking that the Chavant soft may be better for the winter months here in the UK. These teething problems have slowed me down doing my first weeks homework but what has been most challenging is sculpting a simple humanoid form as I do not yet have much knowledge of anatomy, so this has been a great study to do and one I will practice often.


Homework Week 1

So after taking the video above I kept working as it is very addictive using references of anatomy to help me. I need to stop now though and move on to Week 2 which is all about posing as I am already behind and I can continue to practice this stage later on. It really is a fun way to study anatomy.


Sunday, 4 January 2015

Sculpture 2014 - Term 2

Coming back after the summer holidays we started Term 2 with a 2 day lying pose.  No measuring on this one and we got to choose what scale we did. I decided to try and block in the whole pose and learning from my previous experience mad sure I built up this pose so it wasn't too flat like my last effort. This is about 8 hours sculpting.


We then moved onto a 3 day pose about 12 hours.  Again I decided to go fairly small and block in the whole pose. No measuring with this one just sighting like we do when drawing.  Having the opportunity to do this laying down pose has been great as I so rarely get to see this kind of pose so it becomes very challenging to work out the gesture,proportions and the forms of the anatomy.


The last half of term was spent working on a standing pose, and what a great pose it is. This has to be the most exciting pose I have ever seen. The gesture is great and so powerful. I have spent 8 days so far on this so about 32 hours.  We started of taking height measurements of the major anatomical bone points. So sole of foot to patella, sole of foot to illiac crest, sole of foot to super sternal notch, Sole of foot to acromium process.  As I type this I am trying to remember the anatomical names, not so easy, but sculpting is a great way to learn anatomy I think.  We also took widths of hips and shoulders.  As we are working to a third scale all measurements are divided by 3 and then the lengths and widths are added together and extra added for a  base.  This is quite maths intensive for me as numbers are my weakness so I was pleased when we finally had our armature wires worked out and built.  


This is a page from Edouard Lanteri's book Modelling and Sculpting the Human Figure which should give a better idea of how the armature was built. Ours were more simple, without the hand wires and butterflies.  I think measuring and armature building is something I will have to do a lot of before I really know what I am doing and get it fixed in my brain.  An error I made when nailing the wires to my board was that I had not really sighted the back iron in relation to the feet.  This meant my armature looked like it was falling over so I had to take them up and do it again.  This made me realise that I should have looked at the position of the super sternal notch, which is a fixed position on the model and does not move.  From this I should have dropped a horizontal and taken note of the feet placement in relation to this.  The sighted horizontal then becomes the back iron and you can place the wires with better accuracy.  


Once the armature is attached to the board the wire is bent into the shape of the gesture and we applied small amounts of clay which we squeezed on in doughnut shapes all over the wires.  This was left for a week so that it would provide a strong structure to build on.


My progress week to week was fairly slow mainly because I do tend to be slow but also because I was conscious of over building, something I want to try to avoid as this means you have to scrape of and can loose the texture you get as you build. I would like to try to keep some texture on this sculpt rather than smoothing it all down. 


I am quite happy with it at this stage and I shall continue to progress slowly as I try to work out the forms I am looking at which is very challenging with such a well muscled model.  Doing this sculpture really makes me realise how important learning surface anatomy is for artists and also how to simplify that anatomy into planar forms. Hopefully I should get to spend another 5 days on this.  Not enough time to finish but I shall just get what I can done.  Having the opportunity to spend so long studying a pose like this is great and has been a real highlight of my year.

Sculpture 2014 - Term 1

I was lucky enough to have the opportunity to do a full days sculpting at Lavender Hill studios last year. Ever since my first attempt at sculpting I have been keen to do more so this has been really exciting for me.

Term 1- My first challenge was to copy this cast. Straight away our teacher pointed out the we were going to flat and not getting the height of the ribs created by the arch in the back. 

Term 1 - This was a 5 week pose averaging about 4 hours sculpting a day. Again I failed at first to get the height of the ribs from the arch in the back. This has been a good lesson to learn as I rarely get to see and draw laying poses of this nature.

Term 1 - This was a 4 hour attempt to quickly block in a head from the life model.


At the end of this first term we moved into a new sculpture studio which is a great space to work in. Here I took the quick head and began to turn it into a skull.  I couldn't help think that it was turning into an orc from Lord of the Rings.

During the summer holiday break I did a one week sculpture course at Lavender Hill studios. I was asked to just help out with those who were new to the studios and I really enjoyed this. We spent the first three days working on a copy of the skull cast. Which I finished off when we went back for Term 2. The clay had dried out quite a bit so I took it as far as I could. I really enjoyed the challenge of doing the teeth.


The last two days of the July course were spent doing a quarter size portrait, which I found very challenging due to the scale but also this is the first portrait I have sculpted from a life model and it felt very invasive to approach the model with the callipers. She was fine but I obviously need to work on this.  Not the best likeness but for me it is all about trying and seeing what happens. I try not to let the fear of failure stop me from trying as this is how I learn.


Friday, 2 January 2015

Happy New Year

I have a tradition of starting the New Year with a self portrait. So I spent a couple of hours looking at myself in the mirror and having some good fun trying to get a likeness with a raised eyebrow and a slight smile. 

I am looking forward to a year of more drawing and hopefully I will get to spend more time in this pursuit. Thanks to all of you who have supported me to get this far and I wish you all a Happy New Year.